






Notes, cautions, and warnings
Set up your computer
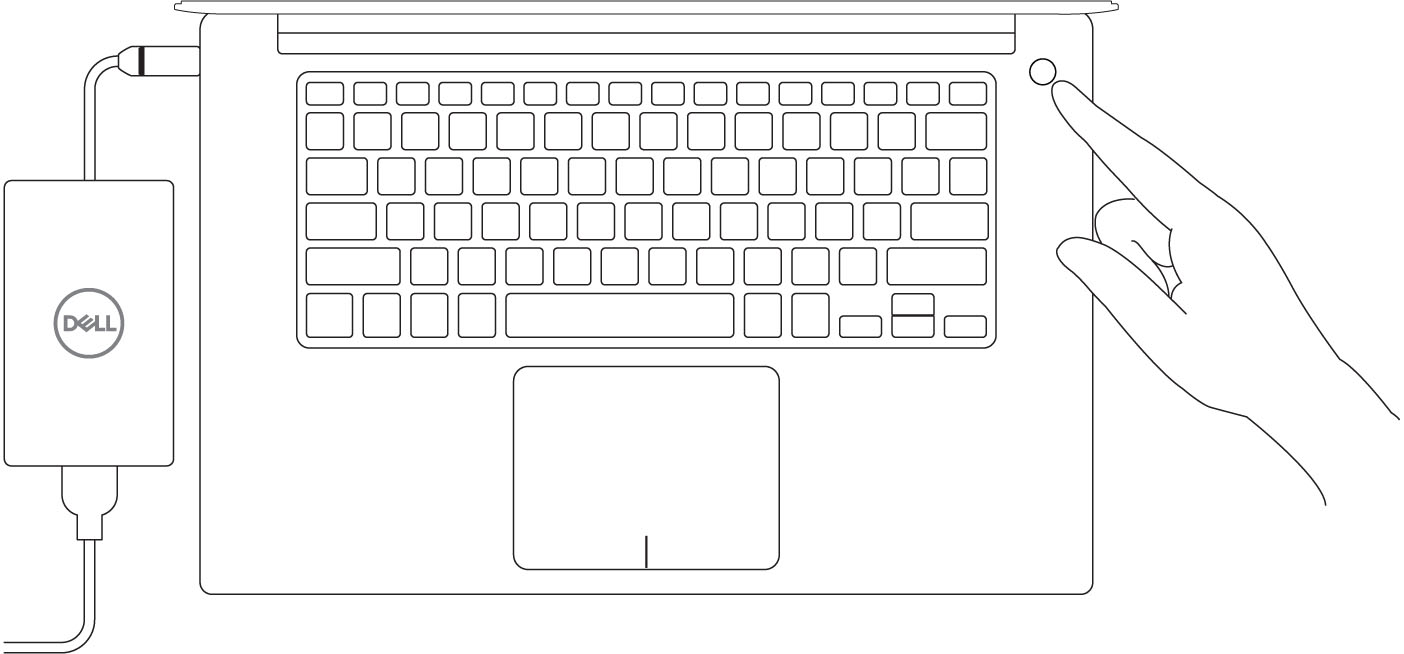
- Connect the power adapter.
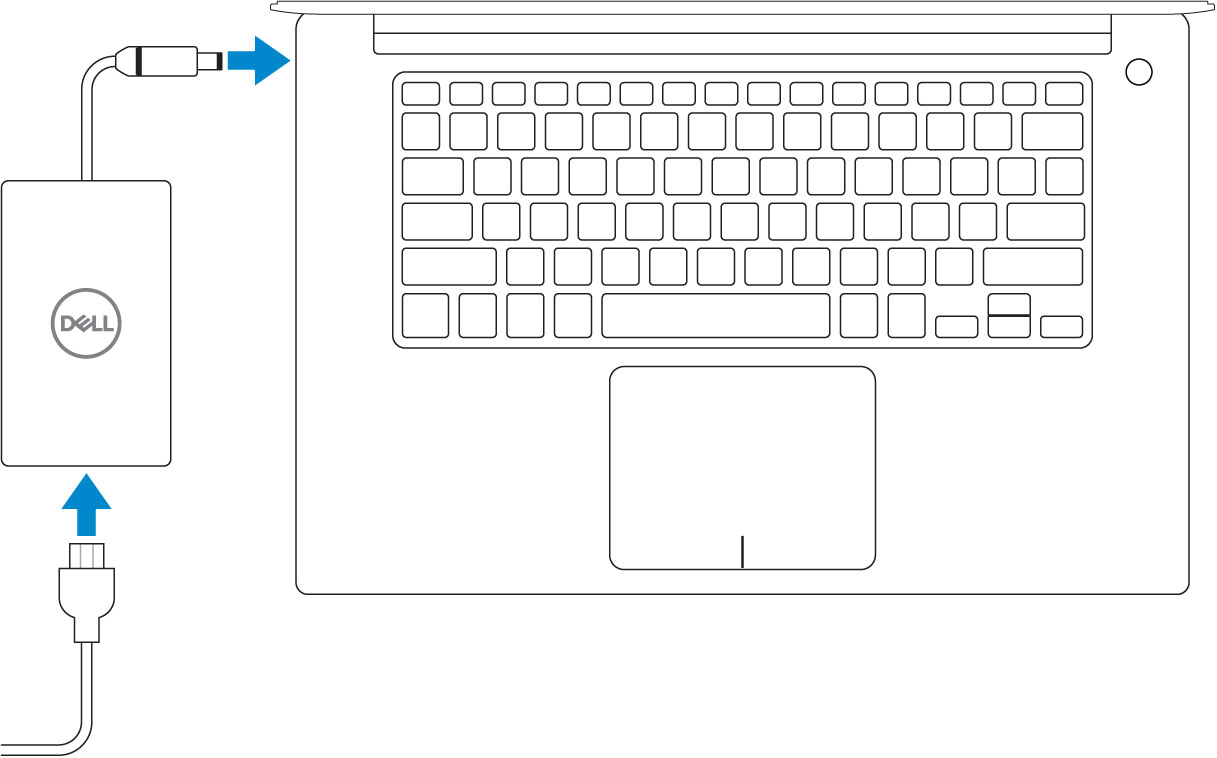
- Press the power button.
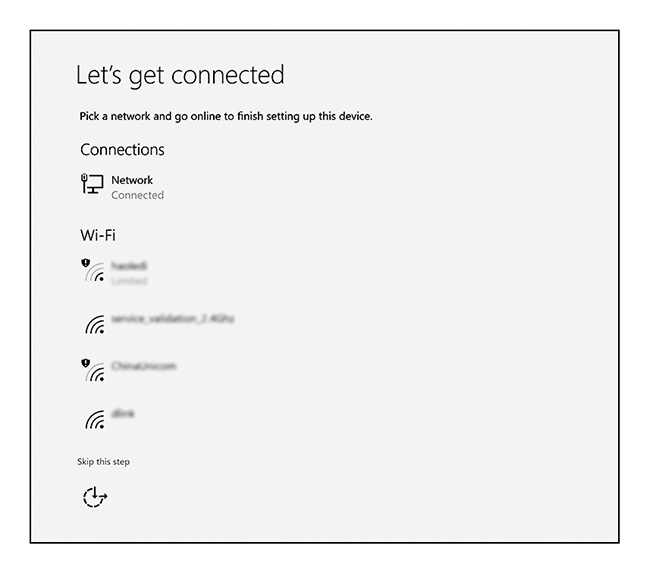
- Follow the instructions on the screen to finish Windows setup:
- Connect to a network.
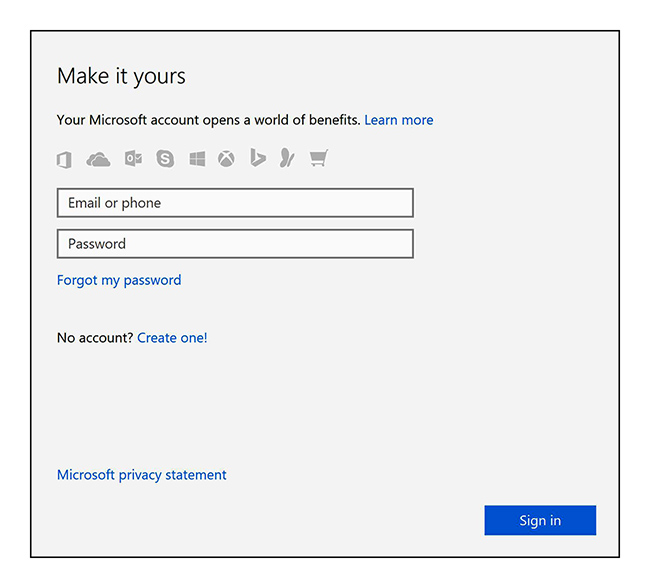
- Sign-in to your Microsoft account or create a new account.
- Connect to a network.
- Locate Dell apps.
Table 1. Locate Dell appsLocate Dell apps 
Register your computer

Dell Help & Support
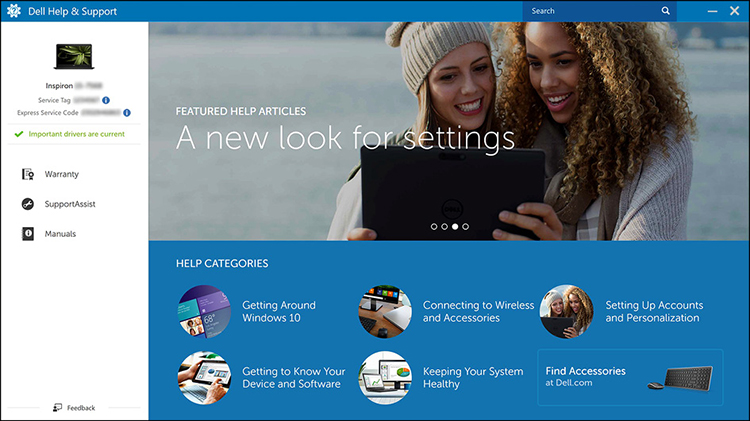

SupportAssist — Check and update your computer
System overview
Front view
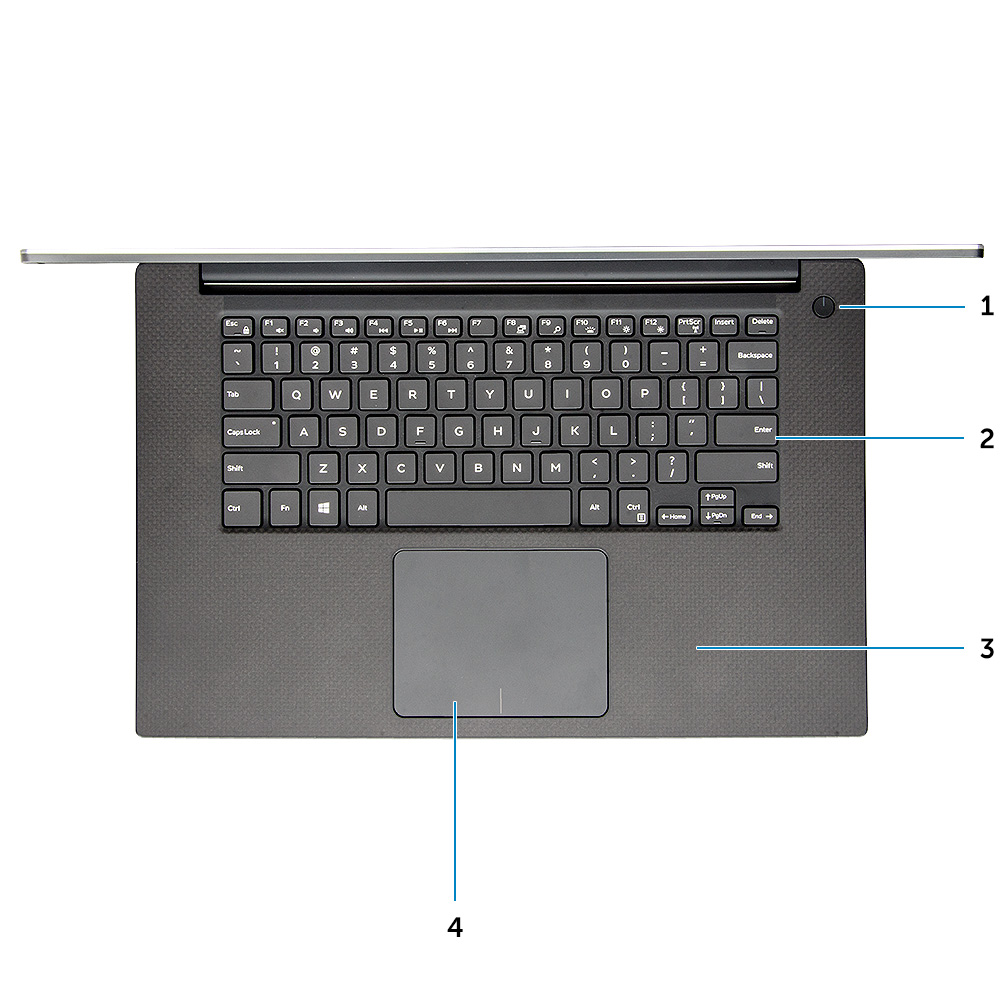
- Power button with light indicator/Power button with fingerprint reader without light indicator (optional)
- Keyboard
- Palmrest
- Touchpad
Front open view
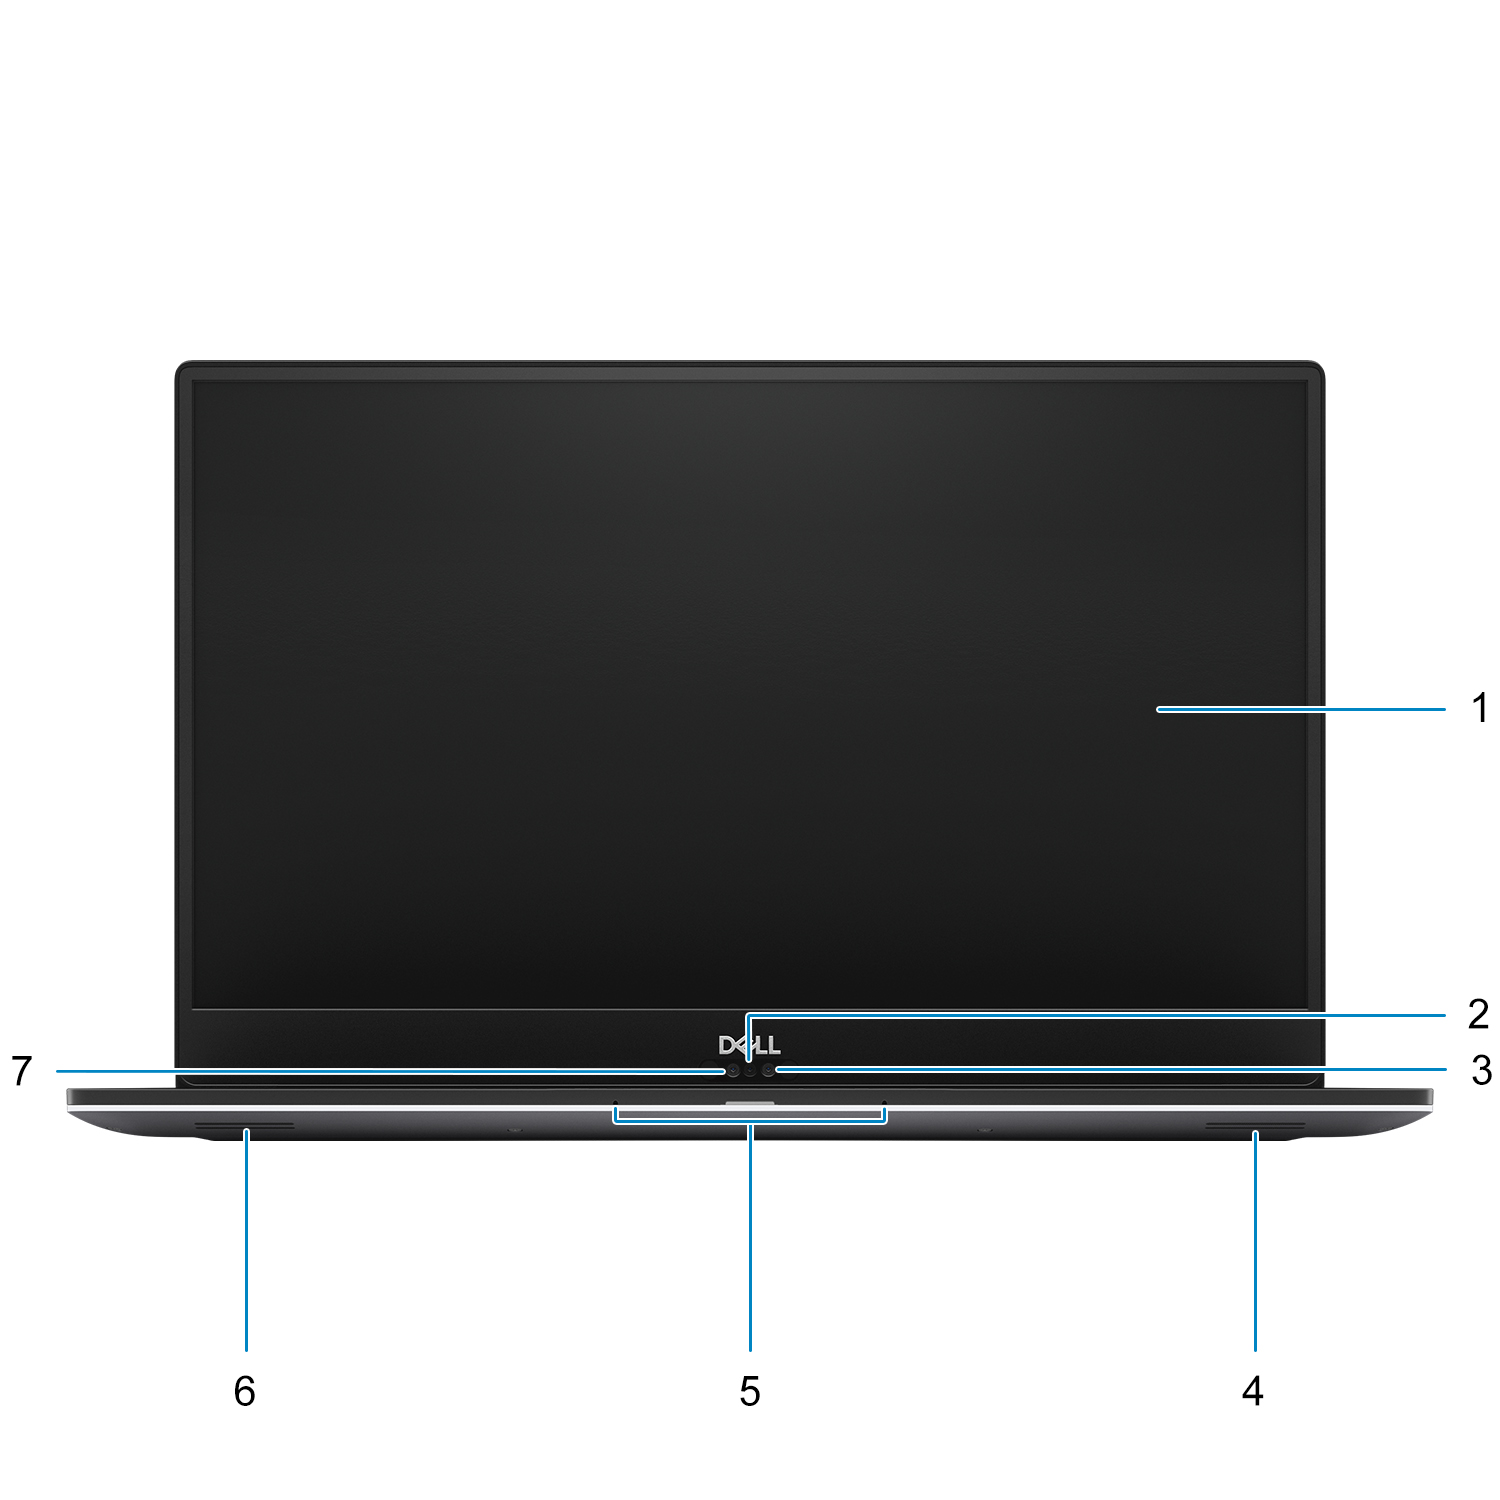
- Display
- Camera-status light
- Infrared camera
- Right speaker
- Microphones
- Left speaker
- HD camera
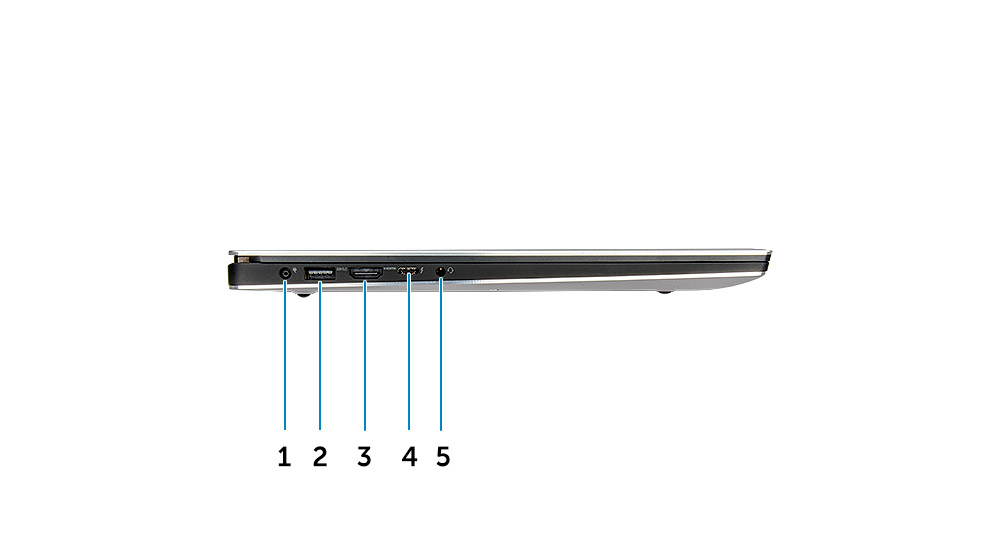
- Power connector port
- USB 3.1 Gen 1 port with PowerShare
- HDMI port
- Thunderbolt 3 Type-C port
- Headset port
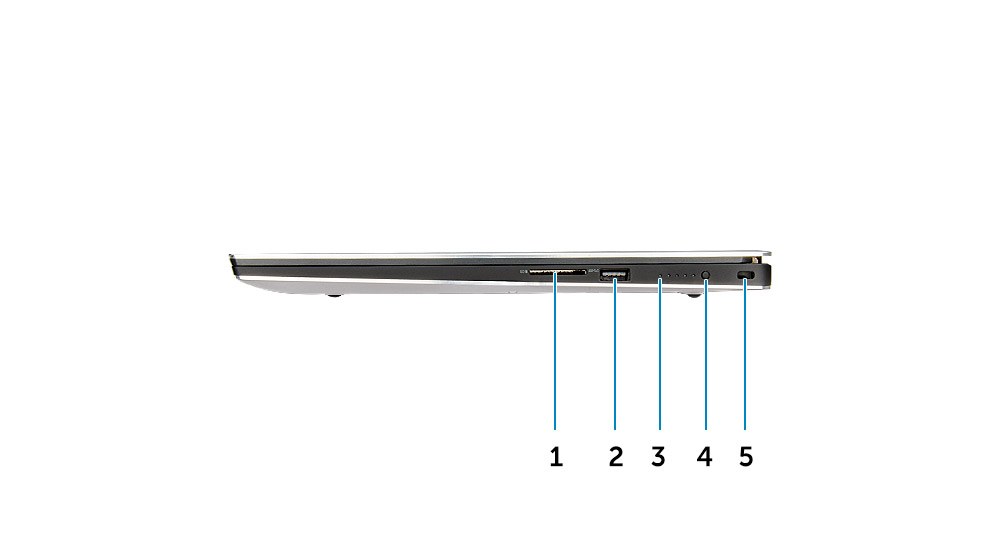
- Memory card reader
- USB 3.1 Gen 1 port with PowerShare
- Battery-charge status lights
- Battery-charge status button
- Noble wedge security slot

- Service tag label
- Regulatory label
Hot key combinations
Keyboard shortcuts
Some keys on your keyboard have two symbols on them. These keys can be used to type alternate characters or to perform secondary functions. The symbol shown on the lower part of the key refers to the character that is typed out when the key is pressed. If you press
shift and the key, the symbol shown on the upper part of the key is typed out. For example, if you press 2, 2 is typed out; if you press Shift+ 2, @ is typed out.
The keys F1-F12 at the top row of the keyboard are function keys for multi-media control, as indicated by the icon at the bottom of the key. Press the function key to invoke the task represented by the icon. For example, pressing F1 mutes the audio (refer to the table below).
However, if the function keys F1-F12 are needed for specific software applications, multi-media functionality can be disabled by pressing Fn + Esc. Subsequently, multi-media control can be invoked by pressing Fn and the respective function key. For example, mute audio by pressing Fn + F1.
| Fn key combination | Description |
|---|---|
| Fn+ F1 | Speaker Mute |
| Fn+ F2 | Volume Down |
| Fn+ F3 | Volume Up |
| Fn+ F4 | Play previous track/chapter |
| Fn+ F5 | Play/Pause |
| Fn+ F6 | Play next track/chapter |
| Fn+ F7 | Task view |
| Fn+ F8 | Display Toggle (Win + P) |
| Fn+ F9 | Search |
| Fn+ F10 | Increase Keyboard Back light Brightness (optional) |
| Fn+ F11 | Panel Brightness Down |
| Fn+ F12 | Panel Brightness Up |
| Fn+ PrtScr | Wireless |
| Function key | Behavior |
|---|---|
| Fn+B | Pause/break |
| Fn+S | Toggle scroll lock |
| Fn+R | System request |
| Fn+Ctrl | Open application menu |
| Fn+Esc | Toggle Fn-key lock |
Processor specifications
| Processor Type | Values |
|---|---|
| Intel Core Processor i9-9980HK | 8 Core, 16MB Cache, 2.40GHz up to 5.00GHz Turbo, 45W |
| Intel Core Processor i9-9880H | 8 Core, 16MB Cache, 2.30GHz up to 4.80GHz Turbo, 45W, vPro |
| Intel Xeon Processor E-2276M | 6 Core, 12M Cache, 2.80GHz up to 4.70GHz Turbo, 45W, vPro |
| Intel Core Processor i7-9850H | 6 Core, 12M Cache, 2.60GHz up to 4.6GHz Turbo, 45W, vPro |
| Intel Core Processor i7-9750H | 6 Core, 12M Cache, 2.60GHz up to 4.5GHz Turbo, 45W |
| Intel Core Processor i5-9400H | 4 Core, 8M Cache, 2.50GHz up to 4.3GHz Turbo, 45W, vPro |
Physical specifications
| Features | Specification |
|---|---|
Height |
11.2 mm (0.44 in) |
Width |
357 mm (14.06 in) |
Depth |
235 mm (9.26 in) |
Weight |
1.8 kg (3.97 lb) NOTE The weight of your computer depends on the configuration ordered and the manufacturing variability. |
BIOS defaults
| System Configuration | SATA Operation | RAID On |
| Drives | SATA-0, SATA-1, and M.2 PCIe SSD-0 | |
| SMART Reporting | Disabled | |
| USB Configuration | Default Enabled: Enable Boot Support, Enabled Thunderbolt Ports; Always Allow Dell Docks; Enabled External USB Port , Security level- User Authorization | |
| USB PowerShare | Disabled | |
| Audio | Enabled, microphone enabled, and Internal speaker enabled | |
| Keyboard Illumination | Bright | |
| Miscellaneous Devices | Camera enabled, SD card enabled | |
| Video | LCD Brightness |
AC 100%, DC 50% |
| Performance | Multiple Core Support: |
All |
Intel SpeedStep™: |
Enabled | |
C States Control: |
Enabled | |
Intel TurboBoost |
Enabled | |
Virtualization Support |
Virtualization | Enabled |
VT for Direct I/O: |
Enabled | |
Trusted Execution |
Disabled | |
| Security | Password | |
Password Configuration |
Min=4, Max=32 | |
| Password Bypass | Disabled | |
| Password Change | Permitted | |
| Non-Admin Setup Changes | Disabled | |
| UEFI Capsule Firmware Updates | Enabled | |
| TPM 2.0 Security | Enabled | |
| Computrace | Deactivate | |
| CPU XD Support | Enabled | |
| OROM Keyboard Access | Enabled | |
| Admin Setup Lockout | Disabled | |
| Master Password Lockout | Disabled | |
| SupportAssist System Resolution | Auto OS Recovery Threshold | 2 |
| SupportAssist OS Recovery | Enabled |
Communication specifications
| Features | Specifications |
|---|---|
|
Network adapter |
Ethernet via USB-to-Ethernet Dongle (Optional) |
|
Wireless |
|
Memory
| Memory type | 2x DDR4 SoDIMM |
| Memory capacity per slot | up to 32 GB |
| Memory speed | 2666 MHz |
| Minimum memory | 8 GB |
| Maximum memory | 64 GB |
| DIMM configurations |
|
Video specifications
Controller | Type | CPU Dependency | Graphics memory type | Capacity | External display support |
|---|---|---|---|---|---|
Integrated Intel UHD 630 | GFX | Intel HD GFX | Integrated | Shared system memory | HDMI 2.0 |
Nvidia Quadro T1000 w/4GB GDDR5 | Discrete | Intel Xeon E-2276M | GDDR5 | 4 GB | HDMI 2.0 |
| Nvidia Quadro T2000 w/4GB GDDR5 | Discrete | Intel Xeon E-2276M | GDDR5 | 4 GB |
HDMI 2.0 |
Audio specifications
| Features | Specification |
|---|---|
Controller | Waves MaxxAudio Pro |
Type | Integrated |
Interface |
|
Display specifications
| Features | Specification |
|---|---|
Type |
Active Matrix Organic Light Emitting Diode (AMOLED) panel Color Depth: 8 bit+2 bit FRC Color Gamut: DCI-P3 Typ.100% Response Time: 1ms Interface type: eDP1.4b + PSR2 (4lane) Polarizer type: Anti Glare Display Mode: Wide view angle: 80/80/80/80 for U/D/L/R (Min) |
Height (Active area) |
|
Width (Active area) |
|
Diagonal |
|
Megapixels |
|
Pixels Per Inch (PPI) |
|
Contrast ratio |
|
Refresh rate | 60 Hz |
Horizontal viewing angle (min) | +/- 89 degrees |
Vertical viewing angle (min) | +/- 89 degrees |
Pixel pitch |
|
Power consumption (max) |
|
Keyboard specifications
| Features | Specification |
|---|---|
Number of keys |
|
Size | Full sized
|
Backlit keyboard | Easy enable/disable via hotkey <Fn+F10 Key> variable brightness levels |
Layout | QWERTY |
Camera
| Features | Specification |
|---|---|
Resolution | HD Camera:
|
Diagonal viewing angle |
|
Touchpad specifications
| Features | Specifications |
|---|---|
Resolution |
|
Dimensions |
|
Multi-touch | Support 5 fingers |
Power supply specifications
| Features | Specification |
|---|---|
Input Voltage | 100 – 240 VAC |
Input frequency | 50 – 60 Hz |
Type | 130 W AC Adapter |
Power adapter
| Features | Specification |
|---|---|
Type | 130W adapter |
Input Voltage | 100 to 240 VAC |
Adapter size | Height:22 mm (0.86 inches) Width:66 mm (2.59 inches) Depth:143 mm (5.62 inches) |
Input frequency | 50 Hz to 60 Hz |
Output current | 130 W - 6.67 A (continuous) |
Rated output voltage | 19.5 VDC |
Temperature range (Operating) | 0° to 40° C (32° to 104° F) |
Temperature range (Non-Operating) | 40° to 70° C (-40° to 158° F) |
Battery
| Features | Specifications |
|---|---|
Type |
|
Dimension |
|
Weight (maximum) | 450.00 g (0.992 lb) |
Voltage |
|
Life span | 300 discharge/recharge cycles |
Charging time when the computer is off (approximate) | 4 hours |
Operating time | Varies depending on operating conditions and can significantly reduce under certain power-intensive conditions |
Temperature range: Operating | 0°C to 35°C (32°F to 95°F) |
Temperature range: Storage | -40°C to 65°C (-40°F to 149°F) |
Coin-cell battery | ML1220 |
Storage specifications
| Storage specifications |
|---|
2.5" 7mm 500GB 7200RPM SATA Hard Drive |
2.5" 7mm 500GB 7200RPM SATA FIPS Hard Drive |
2.5" 7mm 1TB 7200RPM SATA Hard Drive |
2.5" 7mm 2TB 5400RPM SATA Hard Drive |
256GB M.2 NVMe PCIe SSD Class 40 |
512GB M.2 NVMe PCIe SSD Class 40 |
1TB M.2 NVMe PCIe SSD Class 40 |
2TB M.2 NVMe PCIe SSD Class 40 |
512GB M.2 NVMe PCIe SED SSD Class 40 |
1TB M.2 NVMe PCIe SED SSD Class 40 |
512GB M.2 NVMe PCIe SSD Class 50 |
1TB M.2 NVMe PCIe SSD Class 50 |
Port and connector specifications
| Features | Specification |
|---|---|
USB |
|
Security | One security-cable slot (wedge-shaped) |
Audio | One headset (headphone and microphone combo) port |
Video | One HDMI 2.0b port |
| Memory Card reader | One SD-card slot |
BIOS overview
The BIOS manages data flow between the computer's operating system and attached devices such as hard disk, video adapter, keyboard, mouse, and printer.
Entering BIOS setup program
- Turn on your computer.
-
Press F2 immediately to enter the BIOS setup program.
NOTE If you wait too long and the operating system logo appears, continue to wait until you see the desktop. Then, turn off your computer and try again.
Navigation keys
| Keys | Navigation |
|---|---|
| Up arrow | Moves to the previous field. |
| Down arrow | Moves to the next field. |
| Enter | Selects a value in the selected field (if applicable) or follow the link in the field. |
| Spacebar | Expands or collapses a drop-down list, if applicable. |
| Tab | Moves to the next focus area. NOTE For the standard graphics
browser only. |
| Esc | Moves to the previous page until you view the main screen. Pressing Esc in the main screen displays a message that prompts you to save any unsaved changes and restarts the system. |
One time boot menu
The one-time boot menu displays the devices that you can boot from including the diagnostic option. The boot menu options are:
- Removable Drive (if available)
- STXXXX Drive (if available)
NOTE XXX denotes the SATA drive number.
- Optical Drive (if available)
- SATA Hard Drive (if available)
- Diagnostics
The boot sequence screen also displays the option to access the System Setup screen.
System Setup Options
| Option | Description | |||
|---|---|---|---|---|
| System Time/Date | Allows you to set the date and time. | |||
| BIOS Version | Displays the BIOS version. | |||
| Product Name | Displays the product name.
Dell Precision 5530 (Default Setting) |
|||
| Service Tag | Displays the service tag. | |||
| Asset Tag | Displays the asset tag.
None (Default Setting) |
|||
| CPU Type | Displays the CPU type. | |||
| CPU Speed | Displays the CPU speed. | |||
| CPU ID | Displays the CPU ID. | |||
| CPU Cache | Displays the sizes of the CPU caches. | |||
| Fixed HDD | Displays the type and size of the HDD. | |||
| mSATA Device | Displays the type and size of the mSATA device. | |||
| AC Adapter Type | Displays the type of the AC adapter.
None (Default Setting) |
|||
| System Memory | Displays the size of the system memory. | |||
| Extended Memory | Displays the size of the extended memory. | |||
| Memory Speed | Displays the speed of the memory. | |||
| Keyboard Type | Displays the type of keyboard.
Backlits (Default Setting) |
|||
| Option | Description | |||
|---|---|---|---|---|
| Intel (R) SpeedStep (TM) | Allows you to enable or disable the Intel (R) SpeedStep (TM) feature.
Enabled (Default Setting) |
|||
| Virtualization | This option specifies whether a Virtual Machine Monitor (VMM) can utilize the additional hardware capabilities provided by Intel Virtualization technology. Allows you to enable or disable the Virtualization feature.
Enabled (Default Setting) |
|||
| Multi Core Support | Specifies whether the processor will have one or more cores enabled. All (Default Setting) | |||
| Intel TurboBoost | Enables or disables the Intel TurboBoost mode of the processor. Enabled (Default Setting) | |||
| C-States Control | This option enables or disables additional processor sleep states. Enabled (Default Setting) | |||
| Audio | Enables or disables the integrated audio controller. Enabled (Default Setting) | |||
| Keyboard Illumination | This field lets you choose the operating mode of the keyboard illumination feature. Disabled (Default Setting) | |||
| USB Configuration |
Allows you to configure the integrated USB controller. Default Enabled: Enable Boot Support, Enable Thunderbolt Ports; Always Allow Dell Docks; Enable External USB Port |
|||
| Touchscreen | This field controls whether the touchscreen is enabled or disabled. Enabled (Default Setting) | |||
| AC Behavior | Allows the system (if OFF or in Hibernate) to power-on automatically when AC is inserted. | |||
| Wake On LAN | Allows the computer to power up from the off state when triggered by special LAN. Disabled (Default Setting) | |||
| Advanced Battery Charge Configuration | Maximizes battery health while still supporting heavy use during the work day. Disabled (Default Setting) | |||
| Block Sleep | Lets you to block entering to sleep (S3 state) in OS environment. Disabled (Default Setting) | |||
| Auto On Time | Sets the time of day when you would like the system to turn on automatically. Disabled (Default Setting) | |||
| Peak Shift | Minimizes AC power usage at times of peak demand. Disabled (Default Setting) | |||
| USB Wake Support | Allows you to enable USB devices to wake the system from Standby. Enabled (Default Setting) | |||
| LCD Brightness | This options sets the panel brightness independently for Battery and AC power. | |||
| USB Emulation | Allows you to enable or disable the USB Emulation feature.
Enabled (Default Setting) |
|||
| USB PowerShare | Allows you to enable or disable the USB PowerShare feature.
Enabled (Default Setting) |
|||
| USB Wake Support | This option allows you to enable USB devices to wake the system from Standby.
Disable(Default Setting) |
|||
| SATA Operation | Displays the SATA Operation information. | |||
| Adapter Warnings | Allows you to enable or disable the adapter warnings feature. | |||
| Multimedia Key Behaviour |
Function Key (Default Setting) |
|||
| Battery Health | Displays the battery health information. | |||
| Battery Charge Configuration |
Adaptive (Default Setting) |
|||
| Miscellaneous Devices | Allows you enable or disable the various on board devices. The options are:
|
|||
| Option | Description |
|---|---|
| Unlock Setup Status |
Unlocked (Default Setting) |
| Admin Password Status | Displays the status of the admin password.
Default Setting: Not set |
| System Password Status | Displays the status of the system password.
Default Setting: Not set |
| HDD Password Status | Displays the status of the system password.
Default Setting: Not set |
| Asset Tag | Allows you to set the asset tag. |
| Admin Password | Allows you to set, change, or delete the administrator (admin) password.
NOTE You must set the admin password before you set the system or hard drive password.
NOTE Successful password changes take effect immediately.
NOTE Deleting the admin password automatically deletes the system password and the hard drive password.
NOTE Successful password changes take effect immediately.
|
| System Password | Allows you to set, change or delete the system password.
NOTE Successful password changes take effect immediately.
|
| HDD Password | Allows you to set, change or delete the administrator password. |
| Strong Password | This field enforces strong passwords that contain at least one uppercase character, one lowercase character, and be at least 8 characters long. |
| Password Change | Allows you to enable or disable permissions to set a System password and a Hard Drive password when the admin password is set.
Default Setting: Permitted |
| Password Bypass | This option lets you bypass the System (Boot) password and the internal HDD password prompts during system re-start. Disabled (Default Setting) |
| Password configuration | These fields control the minimum and maximum number of characters allowed for Admin and System passwords. |
| Computrace | Allows you to activate or disable the optional Computrace software The options are:
NOTE The Activate and Disable options will permanently activate or disable the feature and no further changes will be allowed.
|
| TPM Security | This option lets you control whether the Trusted Platform Module (TPM) in the system is enabled and visible to the operating system. When disabled the BIOS will not turn On the TPM During POST. The TPM will be non-functional and invisible to the operating system. When enabled, the BIOS will turn On the TPM during POST so that it can be used by the operating system. This option is
Enable by default.
NOTE Disabling this option does not change any settings you may have made to the TPM, nor does it delete or change any information or keys you may have stored there. It simply turns Off the TPM so that it cannot be used. When you re-enable this option, the TPM will function exactly as it did before it was disabled.
NOTE Changes to this option take effect immediately.
|
| UEFI Capsule Firmware Updates | This option controls whether this system allows BIOS updates via UEFI capsule update packages. Enabled (Default Setting) |
| CPU XD Support | This option enables or disables the Execute Disable mode for the processor. Enabled (Default Setting) |
| OROM Keyboard Access | This option determines whether users are able to enter Option ROM configuration screens via hotkeys during boot. |
| Option | Description | |||
|---|---|---|---|---|
| Boot List Option |
Default Setting: Legacy |
|||
| Secure Boot | This option enables or disables the Secure Boot feature.
|
|||
| Load Legacy Option ROM | This option enables or disables the Load Legacy Option ROM feature.
|
|||
| Expert Key Management | Expert Key Management allows the PK, KEK, db, and dbx security key databases to be manipulated. Disabled (Default Setting) | |||
| Intel Software Guard Extensions | Intel SGX Enabled: Enables Intel Software Guard Extensions (SGX) to provide a secured environment for running code/storing sensitive information in the context of the main OS. Enabled (Default Setting) | |||
| Set Boot Priority | Allows you to change the order in which the computer attempts to find an operating system:
|
|||
| Adapter Warnings | Lets you choose whether the system displays warning messages when you use certain power adapters. Enabled (Default Setting) | |||
| SupportAssist OS Recovery | Enables for disables the boot flow for SupportAssist OS Recovery tool in the event of certain errors. Enabled (Default Setting) | |||
| Keypad (embedded) | Lets you choose one of two methods to enable the keypad that is embedded in the internal keyboard. Fn Key Only Enabled by default. | |||
| Fastboot | This option can speed up the boot process by bypassing some compatibility steps. Minimal (Default Setting) | |||
| Extend BIOS POST Time | Creates an additional pre-boot delay to see POST messages. | |||
| Warnings and Errors | This option cause the boot process to only pause when warnings or errors are detected. Enabled (Default Setting) | |||
| Wireless Switch | Determines which wireless devices can be controlled by the Wireless Switch. WLAN and Bluetooth Enabled (Default Setting) | |||
| SupportAssist System Resolution | Auto OS Recovery Threshold: Controls the automatic boot flow for SupportAssist System Resolution Console and for Dell OS Recovery Tool. Setting 2 default | |||
| Option | Description |
|---|---|
| Save Changes and Reset | Allows you to save the changes you made. |
| Discard Changes and Reset | Allows you to discard the changes you made. |
| Restore Defaults | Allows you to restore the default options. |
| Discard Changes | Allows you to discard the changes you made. |
| Save Changes | Allows you to save the changes you made. |
Updating the BIOS in Windows
- Go to www.dell.com/support.
-
Click
Product support. In the
Search support box, enter the Service Tag of your computer, and then click
Search.
NOTE If you do not have the Service Tag, use the SupportAssist feature to automatically identify your computer. You can also use the product ID or manually browse for your computer model.
- Click Drivers & Downloads. Expand Find drivers.
- Select the operating system installed on your computer.
- In the Category drop-down list, select BIOS.
- Select the latest version of BIOS, and click Download to download the BIOS file for your computer.
- After the download is complete, browse the folder where you saved the BIOS update file.
-
Double-click the BIOS update file icon and follow the on-screen instructions.
For more information, see knowledge base article 000124211 at www.dell.com/support.
Updating the BIOS in Linux and Ubuntu
To update the system BIOS on a computer that is installed with Linux or Ubuntu, see the knowledge base article 000131486 at www.dell.com/support.
Updating the BIOS using the USB drive in Windows
- Follow the procedure from step 1 to step 6 in Updating the BIOS in Windows to download the latest BIOS setup program file.
- Create a bootable USB drive. For more information, see the knowledge base article 000145519 at www.dell.com/support.
- Copy the BIOS setup program file to the bootable USB drive.
- Connect the bootable USB drive to the computer that needs the BIOS update.
- Restart the computer and press F12 .
- Select the USB drive from the One Time Boot Menu.
-
Type the BIOS setup program filename and press
Enter.
The BIOS Update Utility appears.
- Follow the on-screen instructions to complete the BIOS update.
Updating the BIOS from the F12 One-Time boot menu
Update your computer BIOS using the BIOS update.exe file that is copied to a FAT32 USB drive and booting from the F12 One-Time boot menu.
You can run the BIOS update file from Windows using a bootable USB drive or you can also update the BIOS from the F12 One-Time boot menu on the computer.
Most of the Dell computers built after 2012 have this capability, and you can confirm by booting your computer to the F12 One-Time Boot Menu to see if BIOS FLASH UPDATE is listed as a boot option for your computer. If the option is listed, then the BIOS supports this BIOS update option.
To update your BIOS from the F12 One-Time boot menu, you need the following:
- USB drive formatted to the FAT32 file system (key does not have to be bootable)
- BIOS executable file that you downloaded from the Dell Support website and copied to the root of the USB drive
- AC power adapter that is connected to the computer
- Functional computer battery to flash the BIOS
Perform the following steps to perform the BIOS update flash process from the F12 menu:
- From a turn off state, insert the USB drive where you copied the flash into a USB port of the computer.
-
Turn on the computer and press F12 to access the One-Time Boot Menu, select BIOS Update using the mouse or arrow keys then press Enter.
The flash BIOS menu is displayed.
- Click Flash from file.
- Select external USB device.
- Select the file and double-click the flash target file, and then click Submit.
- Click Update BIOS. The computer restarts to flash the BIOS.
- The computer will restart after the BIOS update is completed.
System and setup password
| Password type | Description |
|---|---|
| System password | Password that you must enter to log in to your system. |
| Setup password | Password that you must enter to access and make changes to the BIOS settings of your computer. |
You can create a system password and a setup password to secure your computer.
Assigning a system setup password
You can assign a new System or Admin Password only when the status is in Not Set.
-
In the
System BIOS or
System Setup screen, select
Security and press Enter.
The Security screen is displayed.
-
Select
System/Admin Password and create a password in the
Enter the new password field.
Use the following guidelines to assign the system password:
- A password can have up to 32 characters.
- At least one special character: ! " # $ % & ' ( ) * + , - . / : ; < = > ? @ [ \ ] ^ _ ` { | }
- Numbers 0 through 9.
- Upper case letters from A to Z.
- Lower case letters from a to z.
- Type the system password that you entered earlier in the Confirm new password field and click OK.
- Press Esc and save the changes as prompted by the pop-up message.
-
Press Y to save the changes.
The computer restarts.
Deleting or changing an existing system setup password
-
In the
System BIOS or
System Setup screen, select
System Security and press Enter.
The System Security screen is displayed.
- In the System Security screen, verify that Password Status is Unlocked.
- Select System Password, update, or delete the existing system password, and press Enter or Tab.
-
Select
Setup Password, update, or delete the existing setup password, and press Enter or Tab.
NOTE If you change the System and/or Setup password, reenter the new password when prompted. If you delete the System and/or Setup password, confirm the deletion when prompted.
- Press Esc and a message prompts you to save the changes.
-
Press Y to save the changes and exit from System Setup.
The computer restarts.
Clearing BIOS (System Setup) and System passwords
Supported operating systems
The topic lists the operating systems supported for Precision 5530 .
| Features | Specifications |
|---|---|
| Supported operating systems | Description |
| Windows 10 |
|
| Other |
|
Downloading drivers
- Turn on the .
- Go to Dell.com/support.
- Click Product Support, enter the Service Tag
of your , and then click Submit.
NOTE If you do not have the Service Tag, use the auto detect feature or manually browse for your model.
- Click Drivers and Downloads.
- Select the operating system installed on your .
- Scroll down the page and select the driver to install.
- Click Download File to download the driver for your .
- After the download is complete, navigate to the folder where you saved the driver file.
- Double-click the driver file icon and follow the instructions on the screen.
Downloading the chipset driver
- Turn on the computer.
- Go to Dell.com/support.
- Click Product Support, enter the Service Tag of your computer, and then click Submit.
NOTE If you do not have the Service Tag, use the autodetect feature or manually browse for your computer model.
- Click Drivers and Downloads.
- Select the operating system installed in your computer.
- Scroll down the page, expand Chipset, and select your chipset driver.
- Click Download File to download the latest version of the chipset driver for your computer.
- After the download is complete, navigate to the folder where you saved the driver file.
- Double-click the chipset driver file icon and follow the instructions on the screen.
Contacting Dell
- Go to Dell.com/support.
- Select your support category.
- Verify your country or region in the Choose a Country/Region drop-down list at the bottom of the page.
- Select the appropriate service or support link based on your need.